
SAMBA SSH Tunnelling#
Background#
We need to access file shares across a range of sites. We do not yet have the top level infrastructure to join the centre’s domains together, so we need a way to share network drives between sites for use by the PyMedPhys Streamlit server. In the past we utilised tools such as Citrix’s NetScaler Gateway, however this often has intermittent connection issues and we wanted something more reliable.
As such, we have set up a Windows OpenSSH server at one of our sites, and provided access to that server from an SSH client at each site. That client SSH machine then utilises SSH tunnelling to forward the appropriate ports between the sites and the central hub where the PyMedPhys application is running.
However, this by itself, does not enable network file sharing between sites.
The SAMBA port by default is port 445. Linux machines are more than
capable of accessing file shares that are hosted on custom ports, but Windows
machines are not. So, even though the remote file-shares can be forwarded
through via SSH tunnelling to a range of ports, they cannot be accessed by
Windows clients.
As such, we need to remap the range of incoming ports onto port 445. And
herein lies the issue. When a Windows machine boots up, port 445 is promptly
occupied by lanman. As such this port can no longer be utilised for SSH
tunnelling. This service can be set to be a delayed start, and then loopback
devices can be created, however we found that Windows updates would often come
in and clobber these settings throwing the whole networking system down.
This approach was documented over at https://www.nikhef.nl/~janjust/CifsOverSSH/.
As such, we instead opted to go for creating an Ubuntu machine within Hyper-V
and having it be in-charge of remapping the ports. This is the document
describing how to set up a fresh instance of an Ubuntu VM such that it can
remap SSH tunnelled SAMBA ports onto port 445 for use by Windows clients.
This approach has been reliable.
Pre-requisites#
A fresh minimal installation of Ubuntu 20.04 within Hyper-V utilising the official Ubuntu iso.
Set this up with a single
Externaltype network adapterDisable secure boot
Utilise Generation 2 so that UEFI is available
Throughout this document it will be assumed that the non-root username on the Ubuntu machine is
pexit
A set up Windows OpenSSH server. For use within this document it will be assumed that the server is running on the hostname
rccc-sshand all ssh clients will connect as the non-administratorpexituser. The config is the following:
Port 38471
PubkeyAuthentication yes
PasswordAuthentication no
GatewayPorts yes
SSH tunnels already set up to forwarding ports through to a PC on the local network. This PC throughout this document will be called
rccc-ssh. The ports being forwarded through torccc-sshfrom remote SSH clients for this document will be ports44445-44451.A range of IP addresses that can be utilised for the remapping of port
445onto them. Throughout this document these IP addresses will be192.168.100.230-192.168.100.236.The DNS IP address. Throughout this document this will be assumed to be
192.168.100.15
Overview#
The general approach here will be to:
first add the IP addresses that we will be occupying,
then create an SSH key pair, add the public key to the server’s list of authorised keys,
and then lastly set up the appropriate SSH port forwarding so that it runs on boot and retries when there are network interruptions.
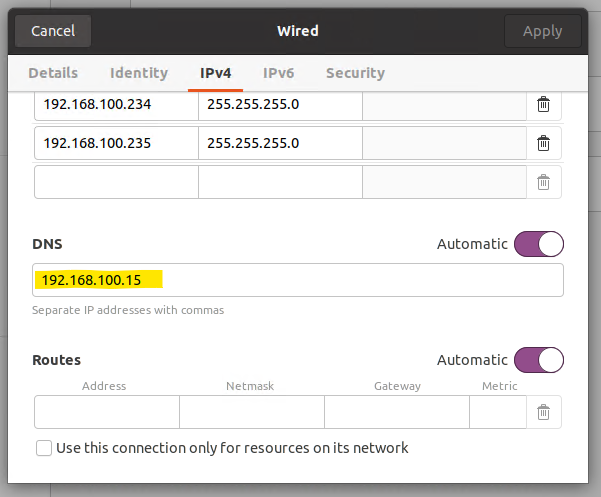
Setting the IP addresses#
Utilise the gnome-control-center to change the IPv4 network settings to
Manual, and then add in the IP addresses that you would like to have this
VM occupy.
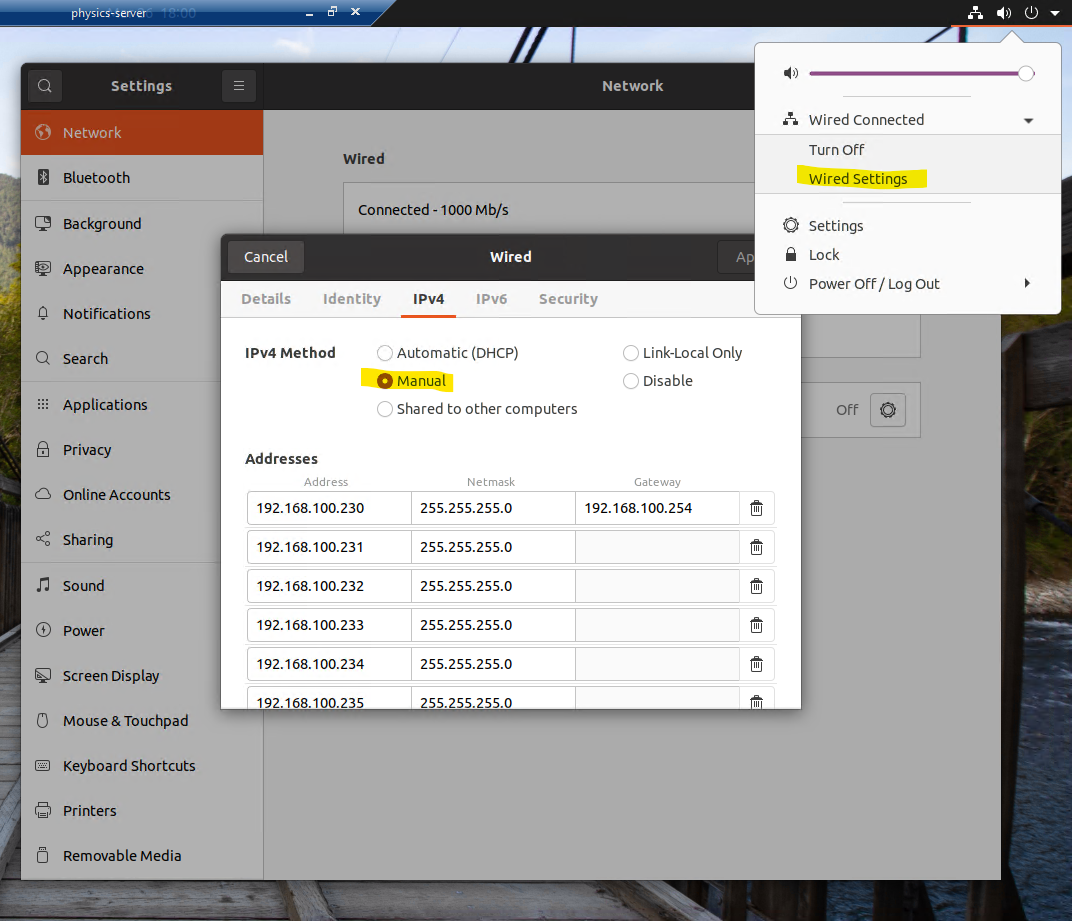
Once the IPv4 method has been set to Manual you may lose internet access and/or the ability to resolve network hostnames. As such you need to also add in the IP address of the DNS server.
Add SSH server to hosts file#
At this stage, the Ubuntu image in question still struggled to find the
rccc-ssh host. As such, as a work-a-round, the file at /etc/hosts was
edited to include the line 192.168.100.13 rccc-ssh.
Initial set up of the SSH connection#
Run the command ssh-keygen -t ed25519 to create an SSH key pair. See the
GitHub docs
for more details on this.
Then add the contents of the newly created file ~/.ssh/id_ed25519.pub to the
C:\Users\pexit\.ssh\authorized_keys file stored on the rccc-ssh server.
Then test that this has been successful by running:
ssh pexit@rccc-ssh -p 38471
The above command is required at least once, so that the host key can be added
by ssh to the known_hosts file.
Note
If you see the error Permission denied (publickey,keyboard-interactive) the
cause is likely either the key hasn’t been added to the authorized_keys file
appropriately, or that the authorized_keys file has the wrong permissions.
Simply deleting the authorized_keys file and then recreating it as the
pexit user should fix its permissions. To see if this is working it a helpful
troubleshooting step is to see if the pexit user can ssh into
pexit@localhost while on the rccc-ssh server.
Since port 445 is a privileged port we need to utilise authbind to allow
ssh to listen on this port without being a root user. This process is as
follows utilising the tips found at https://superuser.com/a/892391:
sudo apt install authbind
sudo touch /etc/authbind/byport/445
sudo chmod 500 /etc/authbind/byport/445
sudo chown pexit /etc/authbind/byport/445
Then, from there, an initial test of the port forwarding can be undergone:
authbind ssh -N -L 192.168.100.233:445:localhost:44448 pexit@rccc-ssh -p 38471
With the above command still running, verify that going to the address
\\192.168.100.233 within Windows Explorer on a Windows client does indeed
present the user with the tunnelled network share drive.
Setting up the SSH port forward service to run on boot#
So that the port forwarding is self-healing in case of network interruptions
we will be utilising the package autossh. These instructions here were
adapted from https://www.everythingcli.org/ssh-tunnelling-for-fun-and-profit-autossh/#gfm-8.
Also, when running this autossh service, we want the service to run as the
pexit user so that the SSH key-pair created and authorised above gets
utilised. And so that we are not unnecessarily running our commands as root.
The guide for adding a systemd service as a custom user was adapted from
https://askubuntu.com/a/676022.
First, verify that the command that is going to be run works as expected. In our case this full command was:
/usr/bin/authbind --deep \
  /usr/bin/autossh -M 0 -o "ServerAliveInterval 30" -o "ServerAliveCountMax 3" -N \
  -L 192.168.100.230:445:localhost:44445 \
  -L 192.168.100.231:445:localhost:44446 \
  -L 192.168.100.232:445:localhost:44447 \
  -L 192.168.100.233:445:localhost:44448 \
  -L 192.168.100.234:445:localhost:44449 \
  -L 192.168.100.235:445:localhost:44450 \
  -L 192.168.100.236:445:localhost:44451 \
  pexit@rccc-ssh -p 38471
Then, once it has been verified that the above command worked as expected,
the following file was created at /etc/systemd/system/autossh-samba-tunnel.service:
[Unit]
Description=AutoSSH samba port forwarding
After=network.target

[Service]
User=pexit
Group=pexit
Environment="AUTOSSH_GATETIME=0"
ExecStart=/usr/bin/authbind --deep \
  /usr/bin/autossh -M 0 -o "ServerAliveInterval 30" -o "ServerAliveCountMax 3" -N \
  -L 192.168.100.230:445:localhost:44445 \
  -L 192.168.100.231:445:localhost:44446 \
  -L 192.168.100.232:445:localhost:44447 \
  -L 192.168.100.233:445:localhost:44448 \
  -L 192.168.100.234:445:localhost:44449 \
  -L 192.168.100.235:445:localhost:44450 \
  -L 192.168.100.236:445:localhost:44451 \
  pexit@rccc-ssh -p 38471

[Install]
WantedBy=multi-user.target
To then enable this service the following was run:
sudo systemctl daemon-reload
sudo systemctl start autossh-samba-tunnel.service
sudo systemctl enable autossh-samba-tunnel.service
Viewing the logs#
To view the logs for this service the following can be run:
journalctl -u autossh-samba-tunnel.service